


Attributes consist of the physical information about the product, such as color, size, material, shape, weight, and options.

A key aspect of the attribute section is that an item cannot be made active without at least one product color.
Within the Attributes tab, you are able to add, edit, or remove:
Product Colors (Required)
Add a New Color
To add a color for the product, click the general color group (i.e. blue, green, red) which applies to the product. The color criteria/options will display below the colors swatches.
If you want to name your color, click the Rename link and type your specific color name in the name field.
You can also add multiple colors from one general color group. For example, if the product is available in two different blues; such as Lapis and Ocean, select the blue color group twice. Click the rename link on the first Blue color group and type Lapis in the name field. Next, click the rename link on the second Blue color group and type Ocean. Click on the Save link when you are finished.
Select the hue of your color by clicking on the drop down box. By default, the hue will be listed as Medium. You can also add a Hex code to represent an exact color by entering the code in the HEX field. If you enter a HEX code, a preview of the color will be shown in the swatch square.
Color Combinations
To indicate that the product features more than one color in its design, click on the Create Combo link. For example, a raglan t-shirt has a main color on the body and a secondary color for the sleeves. The color listed in the product colors area is the primary color. Select the second color from the Create your Combination Color area.
Use the dropdown to indicate if the color is a secondary, trim or accent color.
- Secondary: if a large portion of the item consists of that color.
- Trim: if the item is trimmed in that color.
- Accent: if the item contains small portions of that color.
Then, click on the Done button. The color will now display with the second color below it. You can use the the Hue dropdown and HEX box to customize the additional color(s).
Create a Color Templates
A color template is a set grouping of colors which can be saved and applied to products. For example, if several products have the same custom colors, you can save the template from one product and apply to as many as you need.
To create a color template, add all of the applicable product colors and configure them. This includes any combination colors, renaming, or custom RGB/HEX codes.
Then, click on the Settings icon (cog) and select Save Template.

Enter a name for the template and then click on Save.

The template is now saved and can be applied to future products.
Apply a Color Template
After creating and saving a color template, it can applied to other products which have the same color values. You can also apply a template and then edit the color information, so if a product has most of the same color values, you can use the template and then edit it accordingly.
To apply a template, go to the Attributes tab for the product and then click on the Settings icon (cog) in the Colors section. Then, select "Apply Template" from the available options.
Deleting a Template
Once a template is no longer needed, it can be deleted by clicking on the Settings icon (cog) in the Colors section and selecting Delete Template.

Choose the name of the template from the dropdown and then click on the Delete button.
Product Size
Add or Edit a Product Size
To add or edit the product size(s), click on the (Select Size) button in the Default Size Type section.

The Select Size Type options window will display a selection of size types based on the Product Type for the item. If you do not see an applicable unit for your product, click on the "View all Size Types" link.

Once you select the size type, enter the size information in the available fields. To add additional sizes, click on the "Add an Additional Size" link. To remove a size, click on the "X" for the size.
After adding or editing the information, click on the Save button.

If you are completely finished managing the product information and are ready to make it live; click on the Make Active button.
Create a Size Templates
A size template is a set grouping of sizes which can be saved and applied to products. For example, if several products have the same sizing, you can save the template from one product and apply to as many as you need.
To create a size template, add all of the applicable product sizes and configure them.
Then, click on the Settings icon (cog) and select Save Template. Enter a name for the template and then click on Save.
The template is now saved and can be applied to future products.
Apply a Size Template
After creating and saving a size template, it can applied to other products which have the same size values. You can also apply a template and then edit the size information, so if a product has most of the same size values, you can use the template and then edit it accordingly.
To apply a template, go to the Attributes tab for the product and then click on the Settings icon (cog) in the Size section. Then, select "Apply Template" from the available options.
Deleting a Template
Once a template is no longer needed, it can be deleted by clicking on the Settings icon (cog) in the Size section and selecting Delete Template.
Choose the name of the template from the dropdown and then click on the Delete button.
Product Material
There are several options when adding materials: add a single material, multiple materials, combination materials or even fabric blends. Start by clicking on the Material Type dropdown. The Select Product Material Type Options window will display a selection of material options based on the Product Type for the item. If you do not see the link for the material type you need, click on the See More link to see all material types available.

To add another available product material, click the Add an Additional Material link.
If your product is made of multiple materials, such as a wool jacket with leather sleeves, click the Create Combo link. You will then be able to select a second material type for your product.
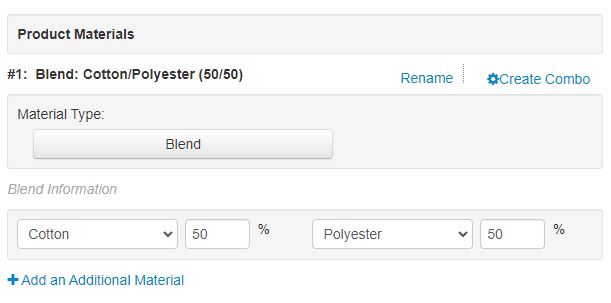
Fabric Blends
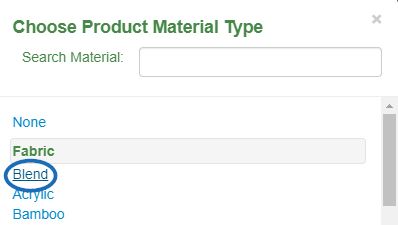
If you are working with fabrics which are blends (cotton/poly, nylon/spandex, etc), under Fabric, choose Blend. Note: If you do not see the Blend option under Fabric, click on the See More link.
In the instance of a cotton/polyester shirt, add the first material and the percentage of the material contained in the fabric and then enter the second material. The percentage of the second material will auto-populate to total 100 percent.
Product Shape
Start typing a shape in the Shapes dropdown. A list will auto-populate below the box. Choose the shape of the product from the dropdown list.
You can also check the Any Shape box if this product is available in any shape in your line or check the Custom Shape box if the shape of the product can be custom designed or ordered.
Item Weight
Use the Item Weight area to include any weight information for this product. Both metric and imperial measurements are available in the unit type dropdown.

Options
Click on the Add a Custom Product Option to add specific options for this product. The Add a Custom Product Option window will open. You will be prompted to indicate whether this option is required for ordering. Next, select "Product" from the Option Type dropdown. Enter a brief Option Name in the Option Name field and then type the value(s) for the option and then hit Enter, Comma or Tab on your keyboard.
Note: When entering values, enter them individually; not as a grouped value. For example, enter "A", "B", "C" not "A, B, or C".
If only one option value can be ordered check the "Can only order one" checkbox. Use the Additional Information field to enter any which may apply to this option.
To include any additional charges for the option, go to the Pricing Tab.
Relationships
There are three types of relationships you can use for a product:
- Companion: For creating complimentary relationships between products.
- Substitute: For creating a substitute relationship between products.
- Common Grouping: For grouping products that share common characters.
To create a new relationship, click on the Add New Relationship button. In the Add New Relationship window, enter a keyword or product number in the Search for Product(s) box and then hit Enter. Then, select the products for which you would like to establish a relationship. After select the product(s), use the dropdown to select the relationship type and then click on the Add Relationship button.

The relationship(s) will now be listed in the relationships section. You can create up to 10 relationships per product.
To remove a relationship, select the Related Product and then click on the Delete Existing Relationship button.

After adding or editing the information, click on the Save button.
Note: If you need to add more information this product and click to another section (such as Imprinting, Pricing, etc), the data you modified in the Attributes tab will saved automatically.
When you are finished updating information and are ready to make the product live; click on the Make Active button.