


To set defaults for your presentations or create custom themes, click on Edit, then select Centerstage Preferences.

The Centerstage Preferences follows a similar workflow as the Centerstage Wizard, starting with choosing a template and ending with Sending and Saving the presentation.
You are able to set preferences for:
Templates Tab
This tab enables you to designate a default template as well as facilitate the set-up of data for templates. Select a template from the drop-down list to refresh the preview on the right side of the screen. When the desired template has been selected, click on the "Make this my Default Template" button and that template will be displayed and used in the Centerstage Wizard.
Below the template selection box there are data fields associated with the template name displayed. These data fields can be changed to other selections. The options are based on the drop down selections for each field.

For example, the data field shows Color, but you would rather display Material in its place. The drop selection for Color can be changed to Material.
If you want to see each change in the Preview before saving all your modifications, click on the Refresh Preview button to update the preview on the right side of the screen. If you want a closer look, click on the Full Page Preview button to display the preview in a pop-out window.

There are three buttons at the bottom:
- Save Changes - will save all changes made and update the preview screen.
- Revert - will undo the last change made before saving
- Load Default Settings - will return all of the data fields for the chosen template to their default state.

Data Field Labels Tab
The Data Field Labels tab allows you to change the data field labels to any other terms you would like to use. Changes made in this screen will affect ALL templates.
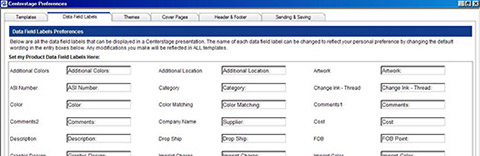
When you have finished updating your data field labels, click on the Save Changes button. If you would like to restore this screen to its default settings, click on the Load Default Settings button.
Themes Tab
The Themes tab defines the "look and feel" of your presentations. This is the feature that allows you to tie the presentation to your business by creating a theme that utilizes your preferred colors. There are a number of ASI themes in this tab, and they can be set as a default by selecting one and clicking on the "Make this My Default" button.
Creating a custom theme is a unique process, please note the following:
- Start with selecting an ESP Online theme that represents your identity.
- Click on the Save As New Theme button.
- Name the theme and click on OK.

Now, you can begin modifying the ASI Theme to your specifications. The items available for editing are in the Items dropdown. If you are not sure what the item in the dropdown is referring to, click on the Show Me button.
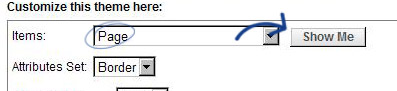
Making a selection from the Item list and clicking on the Show Me button will cause the preview screen to indicate where the item is on the template. Then, use the Attributes Set to customize all available aspects about the selected item.
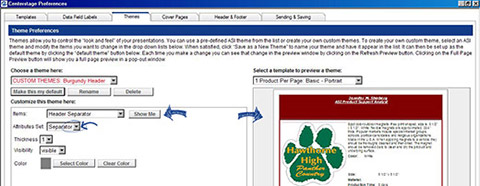
Note: A maximum of 10 custom themes can be created per user.
Cover Pages Tab
The Cover Pages tab allows you to add a cover page to your presentation. The default in ESP Online is no cover page, but this can easily be changed by selecting the cover page you would like to use and clicking on the "Make This My Default Cover Page" button. You can then set up your cover page with the basic information you would like to appear on all presentations, and then customize it in the Centerstage Wizard. If the "Show my Header on all Cover Pages" checkbox is marked, your header will be displayed on all cover pages.
Once a cover page is selected, an editable text or text and image field will appear on the bottom left and the preview will display the cover page. When adding or editing text, you can click on the Refresh Preview button to update the preview screen before you have saved your changes. If an image is uploaded, it must be either a .JPG or .BMP file. Clicking on the Save Changes button will also update the preview screen.

Note: In the Centerstage Wizard, only cover pages that match the layout of the template selected for the presentation will be displayed.
Header & Footer Tab
The Header and Footer tab is for the set-up of header and footer information in your presentation. Once the desired information is set up, you won't need to use the Header & Footer tab in the Centerstage Wizard unless you want to customize it for a specific presentation.
In this screen, you can also upload a logo (Accepted file types for logos are .JPG and .BMP.)and choose your header layout, and enter up to 2 lines of footer text, and elect to have the creation date and page numbers on the presentation.
Note: The header and footer text size is controlled by a theme element, so depending on the font size you have elected for Header Text in the Themes tab, you may only get five lines of text in the header instead of six, etc.

Sending & Saving Tab
The Sending & Saving tab is for the set-up of the defaults in regard to how the presentation will be sent and viewed after creation. You can send the presentation as a link, which will put a link to the presentation in the body of an e-mail, or an attachment, which will open an e-mail and attach a PDF to it.
If electing to send presentations as a link, you can set the link to expire in 1, 5, 10, 20, 30, 60, or 90 days.

If the prices in a presentation are only good for 30 days, that presentation can be sent as a link, and that link will be inactivated in 30 days. It is important to note that the expiration date is 30 days from the date of presentation creation, not the date the presentation is sent.
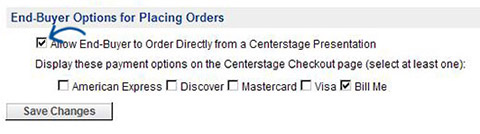
The last section: "End-Buyer Options for Placing Orders" is the interactive centerstage function. You can select which credit cards you would like to accept when using the interactive centerstage.
 Français
 Español