


To create a custom ESP Presentation theme, create a presentation and would save the modifications for future use. To save a presentation's customization as a template, log into ESP and either click into any presentation or create a new one.
Here are a few key sections which can be customized:
Set the Orientation
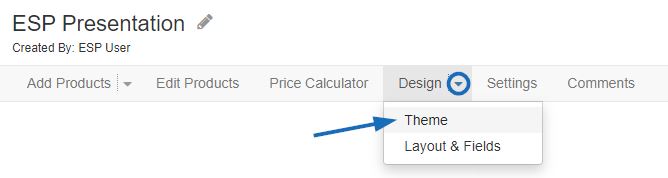
In the ESP Presentation editor, use the arrow next to Design to expand the menu and select "Theme".
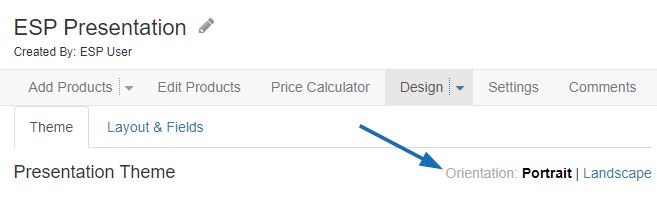
In the Themes section, click to select the orientation of the presentation: portrait or landscape.
Upload a Custom Background
Once you've determined the orientation of the presentation, you can upload a custom background theme.
In the ESP Presentation editor, use the arrow next to Design to expand the menu and select "Theme".
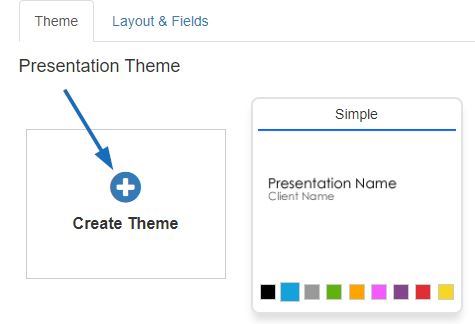
Click on the Create Theme option.
Browse your computer and select the file you would like to use. Uploaded files must meet the exact pixel dimensions:
- Portrait orientation: 1600 pixels by 1200 pixels
- Landscape orientation: 1200 pixels by 1600 pixels
Name the theme and use the dropdown to select the font. To change the text color, click on the color swatch and then select the color you would like to use. Multiple background images can be applied to a single theme using the "Add Image" option and assigned to specific pages within the presentation using the checkboxes. It is important to keep in mind that all files within the same theme must be the same orientation and meet the required pixel dimensions listed above.
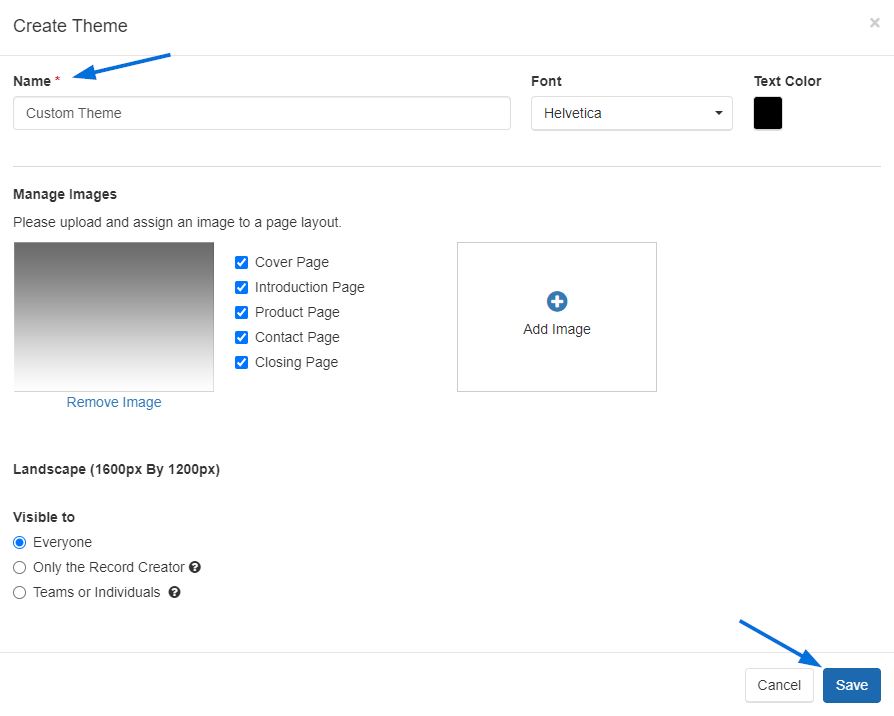
Use the "Visible To" options to choose which users within your company will be able to access this theme.
- Everyone: This theme will be available for editing by all users within your company.
- Only the Record Creator: Only the user who created the theme will be able to view and/or edit it.
- Teams or Individuals: Select a sales team or designate specific individuals within your company with whom you would like to share this theme.
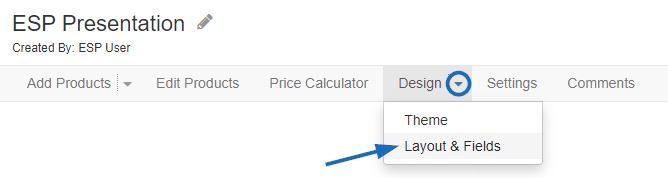
Choose How Many Products per Page
In the ESP Presentation editor, use the arrow next to Design to expand the menu and select "Layout & Fields".
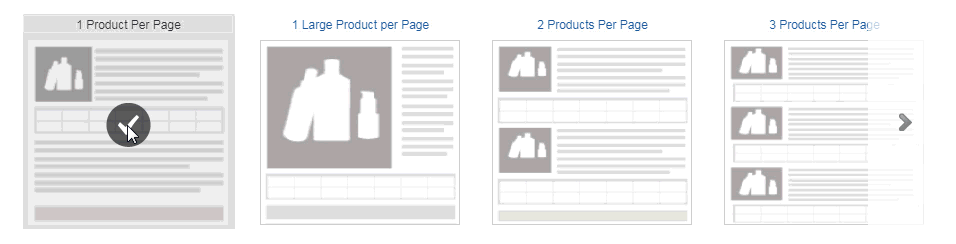
In the Product Layout section, hover on the arrows to the left and right of the product layout thumbnails to scroll through the available options:
- 1 product per page with a large image
- 1 product per page with more details
- 2 products per page
- 3 products per page
- 4 products per page
- 6 products per page
- 12 products per page
Each layout option is available for use with either a portrait or landscape orientation. When you click on the layout you would like to use, a checkmark will appear.
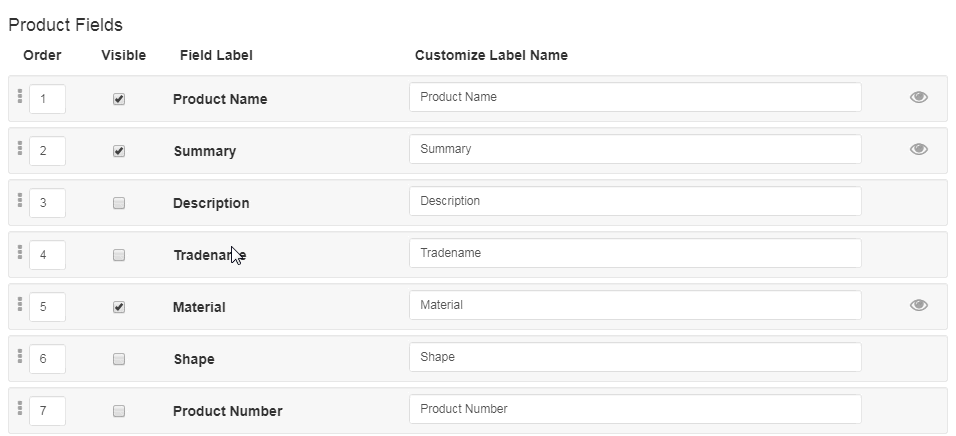
The data fields that are the standard for each template are denoted with the eye icon in the Product Fields section below.
Customize the Product Fields
You are able to select which fields are displayed on the presentation. In the ESP Presentation editor, use the arrow next to Design to expand the menu and select "Layout & Fields".
The standard fields for each template will automatically be marked and denoted by the eye icon to the far right. You are able to uncheck the visible checkbox to not display a field for any products in the presentation. When determining the amount of fields to display, be mindful of the amount of standard fields for the template because adding more than the default number of fields may cause formatting issues.
For example, if you are working with the 12 products per page layout, there is only space for a few fields. However, if you are working with the one product per page layout, you can show much more information for each item. Here is the number of default fields for each layout:
- 1 product per page: Image, Price Grid with Price Includes Statement and 12 additional fields
- 1 large product per page: Image, Price Grid with Price Includes Statement and 7 additional fields
- 2 products per page: Image, Price Grid with Price Includes Statement and 7 additional fields
- 3 products per page: Image, Price Grid with Price Includes Statement and 7 additional fields
- 4 products per page: Image, Price Grid with Price Includes Statement and 7 additional fields
- 6 products per page: Image, Price Grid and 3 additional fields
- 12 products per page: Image, Price Grid and 3 additional fields
Each product field within a layout will be displayed with a customize label name box. Click into the box and type the new field label.
You can also change the order of the Product Fields by clicking on the three vertical dots to the left of the order number, then dragging and dropping the field to a new location. The numbers will change automatically to reflect the new order of the product fields.
In the example below, the Description is made visible, while the Summary is hidden. Then, the Description is moved to the top spot and the Product Number is relocated to the third spot before being renamed to "Reference Number".
Add More Pages
To add more pages to an ESP Presentation, within the editor, click on the Settings option from the main toolbar.

Scroll down to access the page options. The available pages are:
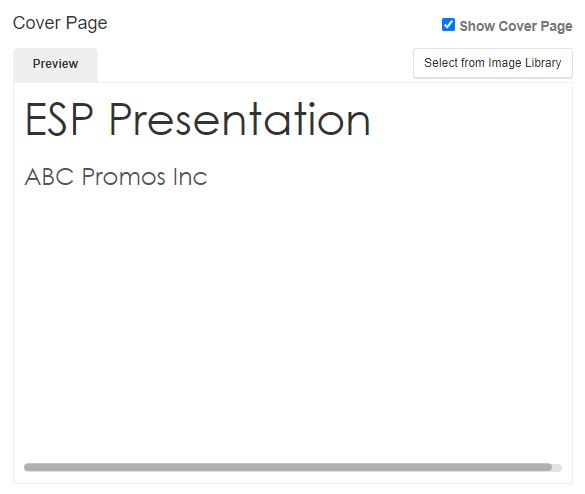
Cover Page
The cover page will be displayed prior to all other pages in an ESP Presentation. Click on the "Show Cover Page" checkbox to include this page on your presentation. On a cover page, the presentation name and customer name will be displayed. This information can be updated in the Presentation Details section directly above the Cover Page option.
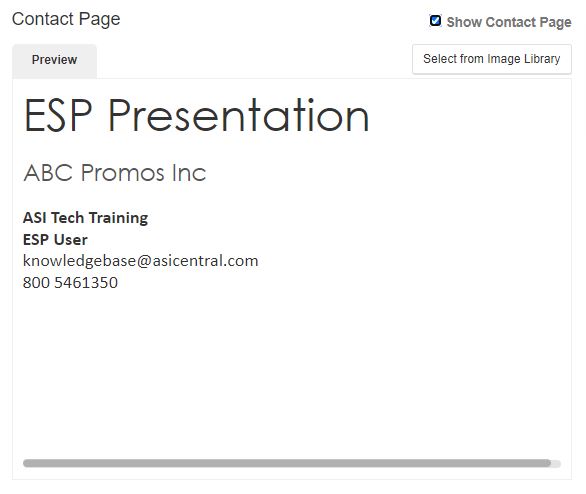
Contact Page
The contact page will be displayed after to all other pages in an ESP Presentation. Click on the "Show Contact Page" checkbox to include this page on your presentation. On a contact page, the presentation name and customer name will be displayed in additon to your company's contact information. This information can be updated in the Presentation Details section directly above the Contact Page option. Images can be uploaded and used via the Media Manager.
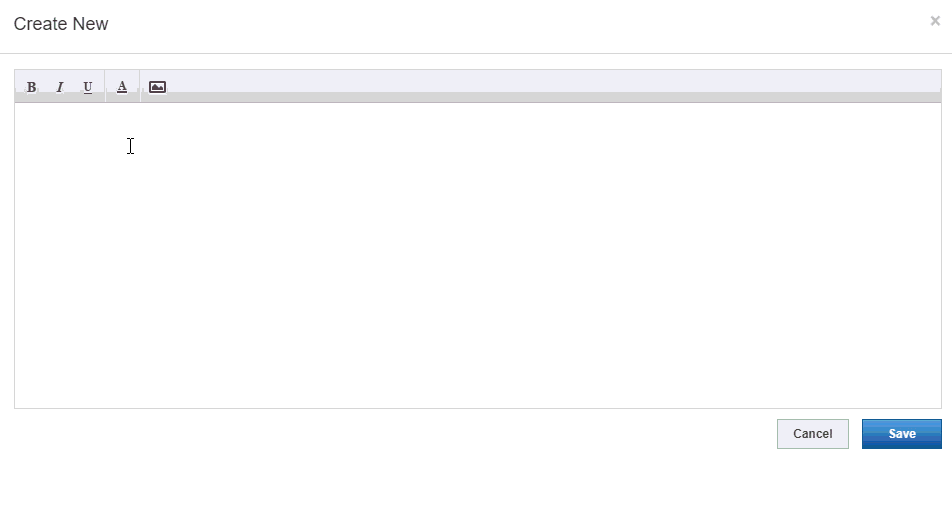
Below is an example of how to add a new page with custom text and an uploaded image.
Introduction and Closing Pages
The Introduction page will be displayed after the cover page, but before the product page(s). The Closing page will be shown after the product page(s) but before the Contact page.
Both the Introduction and Closing pages have generic templates available for use within the dropdowns below their preview boxes. These templates can be customized and saved for future use. You can also click on the Add New button to create a custom page.
After you have finished customizing the presentation, you will want to save it as a template for use on future presentations. To do this, click on the Save as Template option from the options on the top right.

Enter a name in the Template Name box. Click on Save. Your custom template will now be saved in the ESP Presentation Manager and able to be used for all future presentations
