


Banners are images on your site that help keep it fresh and exciting. To update a banner properly, you will need to know which template you have applied to your site to ensure that the banner size is correct before updating it.
Before Making Changes: Identify the Template and Check the Banner Size
Check the template name
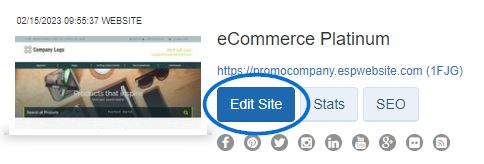
Go to the ESP Websites Admin and click on the Websites Admin tab.

Locate the site you would like to update and click on the Edit Site button.
Click on the plus button to expand Edit Website Design menu and click on the option for Templates & Colors. The template you have selected will be marked with a large checkmark. Note the name of the template.
Banner and Category Tile Image Sizes by Template
Please refer to the table below to locate the banner image size/location and category tile information for each template.
| Template Name | Banners | Category Tile(s) | ||||
| Images (#) | Width (pixels) | Height (pixels) | Images (#) | Width (pixels) | Height (pixels) | |
| Blaze | 3 | 1600 | 585 | Not Applicable | ||
| Branded | 3 | 1500 | 725 | 4 | 500 | 561 |
| Cobalt | 1 | 1600 | 800 | 4 | 500 | 561 |
| Community | 4 | 1600 | 585 | Not Applicable | ||
| Crafted | 4 | 1500 | 725 | Not Applicable | ||
| Evergreen | 4 | 1500 | 725 | Not Applicable | ||
| Flying Ink | 3 | 1600 | 585 | Not Applicable | ||
| Garden | Please contact ASI Technical Product Support | |||||
| Generate | 3 | 1500 | 725 | 2 | 500 | 561 |
| Glory Days | 3 | 1600 | 585 | 5 | 500 | 561 |
| Happy Tails | 3 | 1500 | 725 | 4 | 500 | 561 |
| Headline | Please contact ASI Technical Product Support | |||||
| Health & Support | 5 | 1500 | 725 | 5 | 500 | 561 |
| Home Base | Please contact ASI Technical Product Support | |||||
| Identity 3.0 | 1 | 1500 | 489 | Not Applicable | ||
| Labeled 3.0 | 4 | 1899 | 640 | Not Applicable | ||
| Maple Promos | 4 | 1600 | 585 | 1 | 500 | 561 |
| Mellow | 1 | 1600 | 774 | Not Applicable | ||
| Paper Plane 3.0 | 1 | 1900 | 500 | Not Applicable | ||
| Periodical | 3 | 1600 | 585 | Not Applicable | ||
| Shifting Gears | 3 | 1600 | 585 | 4 | 500 | 561 |
| Snap 3.0 | 3 | 860 | 585 | Not Applicable | ||
| Splash | 3 | 1500 | 725 | 4 | 500 | 561 |
| Spotlight | 3 | 1500 | 725 | Not Applicable | ||
| Stadium | 1 (static)
3 (rotating) |
1001
1500 |
366
725 |
1 | 500 | 561 |
| Stars & Stripes | 4 | 1600 | 585 | 1 | 500 | 561 |
| Sublime | 1 | 1600 | 585 | Not Applicable | ||
| Summit | 3 | 1500 | 725 | 4 | 264 | 296 |
| Tapestry | 4 | 1600 | 585 | Not Applicable | ||
| Team Builders | 3 | 1600 | 585 | 2 | 500 | 561 |
| Thematic | Please contact ASI Technical Product Support | |||||
| Unboxed | 1 | 1600 | 800 | 5* | 143 | 107 |
| Victory | 4 | 1500 | 725 | 4 | 500 | 561 |
Templates for Company Stores
| Template Name | Banners | Category Tile(s) | ||||
| Images (#) | Width (pixels) | Height (pixels) | Images (#) | Width (pixels) | Height (pixels) | |
| Education | 3 | 1500 | 725 | Not Applicable | ||
| Employee Appreciation | 1 | 1500 | 725 | Not Applicable | ||
| Finance | 1 | 1500 | 725 | Not Applicable | ||
| Fundraising Event | 4 | 1500 | 725 | Not Applicable | ||
| Healthcare Market | 4 | 1500 | 725 | Not Applicable | ||
| Real Estate | 3 | 1500 | 725 | Not Applicable | ||
| Social Distancing | 4 | 1500 | 725 | Not Applicable | ||
What is the difference between Banners and Category Tiles?
If you're not sure whether your site is using a banner image or category tiles, here are some key characteristics of each.
Banners:- Larger image size
- More generic imagery or include a slogan
- Single photo that spans the width of the site
- Smaller image size
- Specific to a type of product or idea
- Usually multiple images that display across the width of the site
Ways to Update the Banner(s)
Use an ASI Provided Banner
You are able to replace a banner image with one provided by ASI.
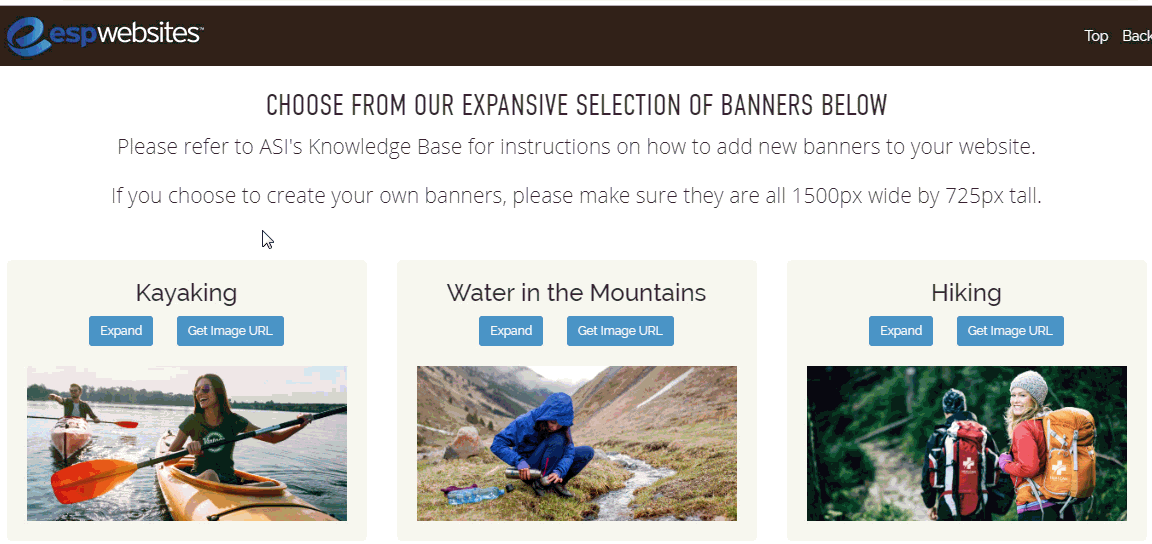
Go to the Banner Downloads page. After locating the image you would like to use, click on the "Get Image URL" button and copy the link. The ASI provided banners are 1500 pixels wide by 725 pixels tall, so they will work well with most templates. If you are using Windows, you can right click and select Copy or hold the Control key and tap C on your keyboard. If you are using a Mac, use Command + C. This will save the URL to your computer's clipboard.
After copying the URL, go to the ESP Websites Admin and click on the Websites Admin tab.
Locate the site you would like to update and click on the Edit Site button.
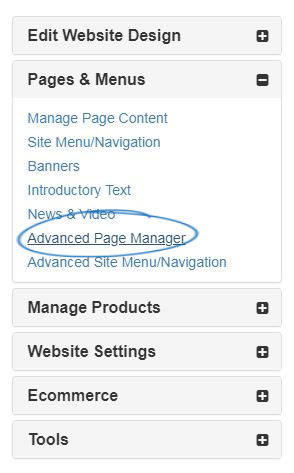
From the options on the left, open the Pages & Menus section and click on the Advanced Page Manager option.
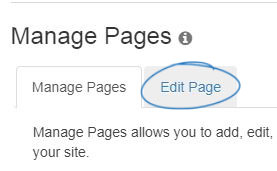
A notification will appear informing you that changes made in this section can impact the features and functionality of your site. Click on Ok. Next, in the Manage Pages section, click on the Edit Page tab.
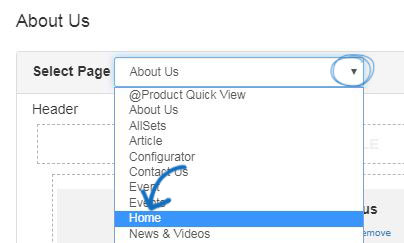
Use the Select Page dropdown to choose Home.
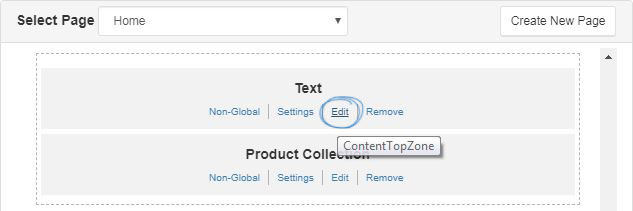
Every feature on your ESP Website is represented as a module and where it is located on the main is determined by its zone. The banners are located within a text module in the main zone of the homepage. Depending on the template you are using, there may be multiple text modules on the homepage. To locate the one you need to update, click on Edit for each text module until you find the image you would like to update.
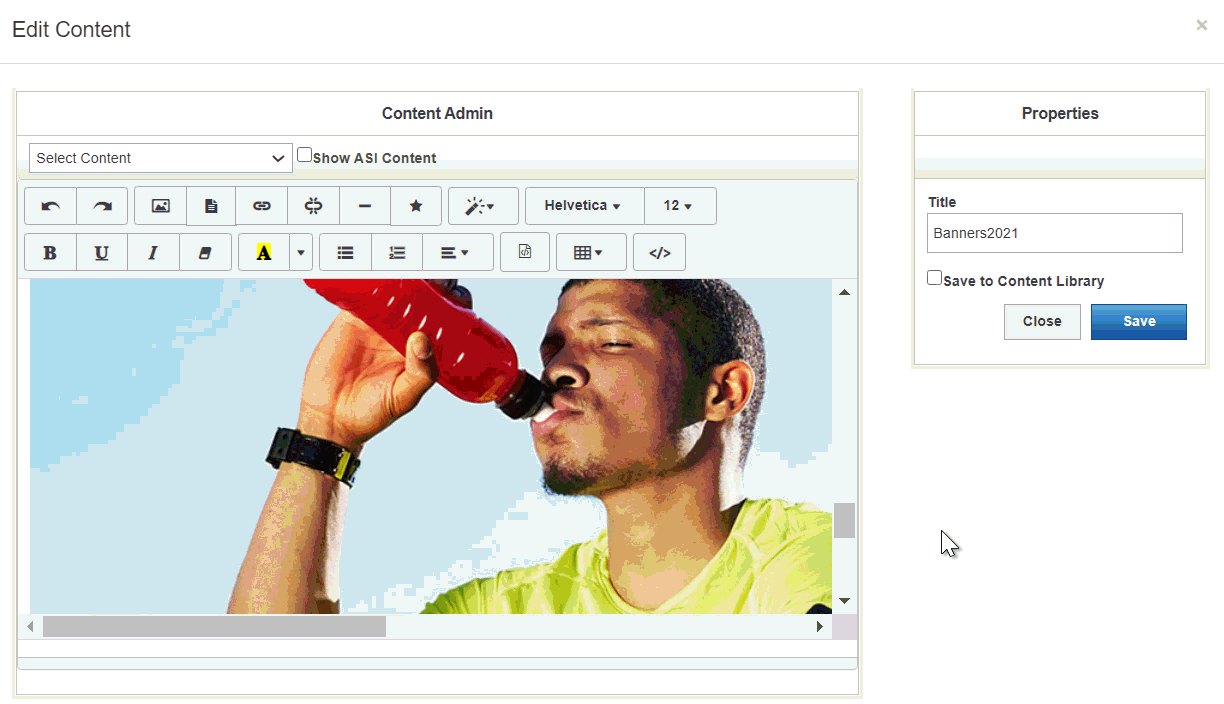
Make sure you are seeing the image from your site that you wish to replace. Click on it and then select Properties (pencil icon) from the toolbar. Replace the link in the Source box with the URL for the banner image you copied. The "Alt Text" box enables you to enter a basic text description of image for ADA compliance. It is optional, but recommended. Lastly, make sure to enter the dimensions for the height and width for the banner. Then, click on OK. The image will be updated. Go to the Properties box on the right and click the Save button.
Lastly, click on the Make Changes Live option. The updated banner should appear on the website within 10 minutes.
Use an Image from My Computer
If you would like to upload your own banner image, please be sure that your image is the correct size for your selected website template to ensure the best result.
To use an image that is saved onto your computer, go to the ESP Websites Admin and then click on the Media Library option from the main toolbar.

The Media Library houses all images uploaded and utilized for all aspects of the ESP Websites. In the Media Library, click on the Upload Media button. Then, browse your computer for the image you would like to use for the banner. Select the file and then click on the Open button. Configure the image properties using the options on the right and then click on the Save Properties button.
After uploading and saving the image you would like to use, click on the My Sites option from the main toolbar and locate the site you would like to update. Click on the Edit Site button.
From the options on the left, open the Pages & Menus section and click on the Advanced Page Manager option.
A notification will appear informing you that changes made in this section can impact the features and functionality of your site. Click on Ok. Next, in the Manage Pages section, click on the Edit Page tab.
Use the Select Page dropdown to choose Home.
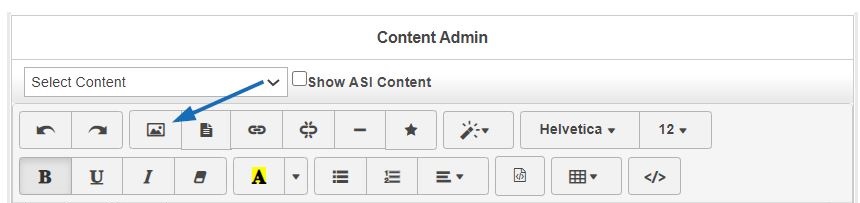
Every feature on your ESP Website is represented as a module and where it is located on the main is determined by its zone. The banners are located within a text module in the main zone of the homepage. Depending on the template you are using, there may be multiple text modules on the homepage. To locate the one you need to update, click on Edit for each text module. Click on the Image Manager icon from the toolbar.
The Media Manager window will open, displaying all available images from the Media Library. Use the upload button to browse your computer and select an image. Then, click on the Upload button.
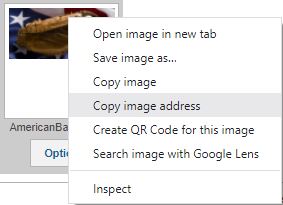
Once the image has been added to the Media Manager, right click on it and select "Copy Image Address".
After copying the image address, locate the banner you would like to replace. Click on it and then select Properties (pencil icon) from the toolbar. Replace the link in the Source box with the URL for the banner image you copied. The "Alt Text" box enables you to enter a basic text description of image for ADA compliance. It is optional, but recommended. Lastly, make sure to enter the dimensions for the height and width for the banner. Then, click on OK. The image will be updated. Go to the Properties box on the right and click the Save button.
Lastly, click on the Make Changes Live option. The updated banner should appear on the website within 10 minutes.

Use a Link to an Image
If the banner image you would like to use is hosted outside of ASI but you have a link to it, you can use that URL to change the image. After copying the URL, go to the ESP Websites Admin and click on the Websites Admin tab.
Locate the site you would like to update and click on the Edit Site button.
From the options on the left, open the Pages & Menus section and click on the Advanced Page Manager option.
A notification will appear informing you that changes made in this section can impact the features and functionality of your site. Click on Ok. Next, in the Manage Pages section, click on the Edit Page tab.
Use the Select Page dropdown to choose Home.
Every feature on your ESP Website is represented as a module and where it is located on the main is determined by its zone. The banners are located within a text module in the main zone of the homepage. Depending on the template you are using, there may be multiple text modules on the homepage. To locate the one you need to update, click on Edit for each text module until you find the image you would like to update.
Make sure you are seeing the image from your site that you wish to replace. Click on it and then select Properties (pencil icon) from the toolbar. Replace the link in the Source box with the URL for the banner image you copied. The "Alt Text" box enables you to enter a basic text description of image for ADA compliance. It is optional, but recommended. Lastly, make sure to enter the dimensions for the height and width for the banner. Then, click on OK. The image will be updated. Go to the Properties box on the right and click the Save button.
Once you have updated the banner image, click on the Make Changes Live option. The updated banner should appear on the website within 10 minutes.
 Français
 Español