


The Pages and Menus section enables you to create and manage the content of your site, including the pages and menus.
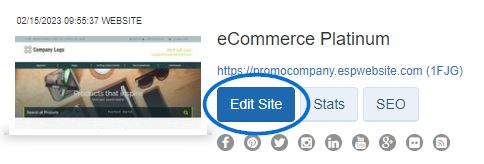
After logging into the ESP Website admin, locate your site and click on the Edit Site button.
Click on the plus button to expand the Pages & Menus area and then make your selection.
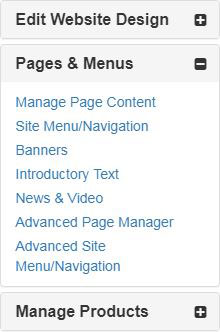
Note: To close the menu, click on the minus button.
The options within the Pages and Menus section include:
Manage Page Content
The Manage Page Content area enables you to manage the content of your ESP Website pages.
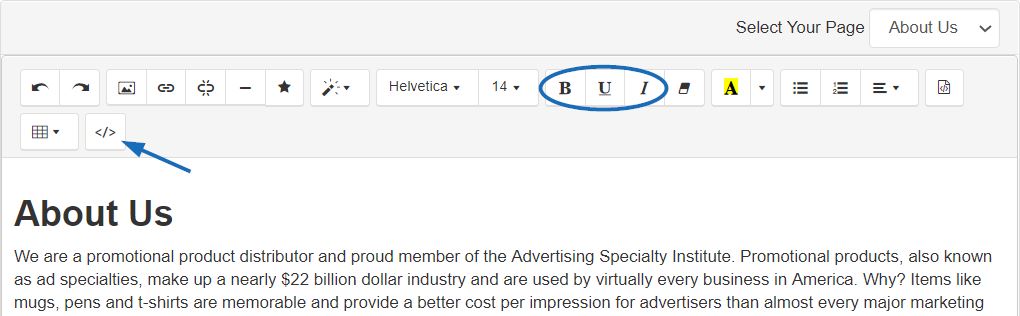
Select the page you would like to edit from the Select Your Page dropdown.
You can then type new text or update the existing text by using the toolbar (hovering over the options in the toolbar will let you know what each tool will help you accomplish) or switching to HTML mode. When you are finished making your changes, click on the Save button at the bottom.
You can use the Create New Page button in the upper right hand corner to begin creating your own custom page for your site.

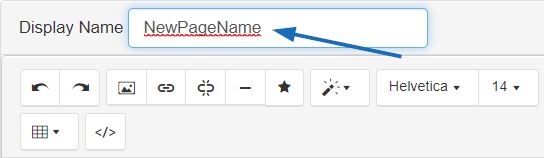
Enter a Display Name. The Display Name is an extension of your URL (ex: abcpromos.espwebsites.com/DisplayName) and cannot contain spaces. Then, enter your text and customize it using the toolbar.
When you are finished making changes, click on the Save button and then click on the Make Changes Live link. All newly created pages will be added to the site map. To view the site map for your ESP Website or Company Store, go to the main site address and type "/sitemap.xml".

Site Menu/Navigation
The Site Menu/Navigation area enables you to edit existing menu items. If you want to create a new menu, go to the Advanced Site Menu/Navigation section. The first step is to edit a menu is selecting which menu you would like to modify. In most templates there is only one navigation menu set up called "Top." This menu pertains to the navigation bar at the top of your website.

If you have more than one menu on your site, you can use the Select a Menu dropdown to choose which menu you want to edit.
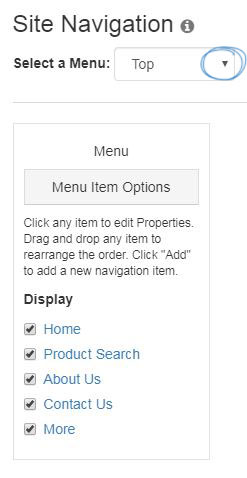
Editing Menu Items
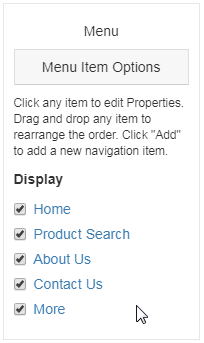
After selecting the menu you would like to edit, click on a menu item to edit its properties or add to it. Next, select a menu item.
It is important to note that "Home" and "Product Search" are static and only the name can be edited.
You can also reorganize the order of the links on the menu by dragging and dropping the items.
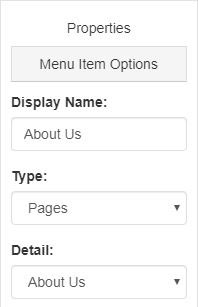
Properties
The Properties column is where we can edit the display name (the name of the menu item that will be displayed on your site), the type of item, and the details.
There are several different types of items available in the dropdown:
- Event: Link to a group of products in various price options created and managed by ASI. If this option is selected, the name of the link will be automatically updated to Event Planner.
- MailTo: Enter an email address email in the Detail box to set up a direct email link.
- Pages: Use the Detail box to select an existing page for this menu item to open.
- Product Collections: Use the Detail box to select an existing product collection for this menu item to display.
- Select-A-Searches: Use the Detail box to select an existing saved search for this menu item to display
- Text: Create a placeholder on the menu.
- Top Categories: Will link to the top categories. If this option is selected, the name of the link will be automatically updated to Top Categories.
- Top Searches: Will link to the top searches. If this option is selected, the name of the link will be automatically updated to Top Searches.
- URL: Create a link to any website address by entering the URL in the Detail box.
The Advanced options will display options for opening the menu item, as well as the ability to enter CSS class information. If you are not well versed in CSS, it is recommended that you do not enter information in the CSS class field.
The navigation found below the Advanced options area of the Properties box is the dropdown menu associated with its parent link. To add a new link to the menu item, called a submenu item, click on the Add button in the lower section of the Properties box.
A second Properties window will be displayed with the "Navigation Item Options" which are the same as in the main navigation. You will need to:
- Add a Display Name
- Select a type
- Select/Add Detail
Click on the Save button.
After you have finished saving your menu changes, click on the Make Changes Live link.
Banners
The Banners area enables you to select from three options:
- I don't want to select banners. Let the system select for me.
- I want banners only from my preferred suppliers. Let the system select for me.
- I want to choose the banners that appear on my site.
After selecting the option you would like to use, choose Small Banner or Large Banner from the dropdown.
If you select the third option, "I want to choose the banners that appear on my site", you will be able to select and organize the banners that will be displayed on your site. Then, drag and drop banners from the Available Banners area into the Banner Loader. Also, you are able to download ASI banners for use on your site.
Note: Banners may take up to 10 minutes to display on your site once added to the Banner Loader.
Large and Small Banners
What's the difference? The small banner is 110 pixels shorter than the large banner. If you're interested in keeping your content close to the top of the page, but still want to display banners, this is a good option for you!
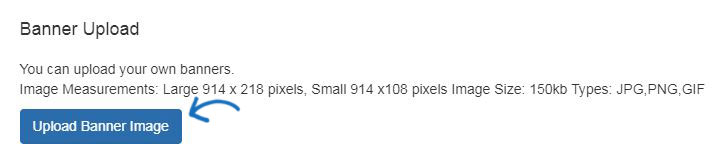
- Large Banner: 914 pixels wide x 218 pixels high
- Small Banner: 914 pixels wide x 108 pixels high
The maximum file size for banners is 150kb
After you've selected whether or not you want to display a large banner or a smaller banner, and you don't have any banners of your own, you can select and/or rearrange the banners available.
You will see the following options:
- Company Banners
- Personal Shared Banners
- Personal Banners
- ASI Banners
To add your banners to the Banner Loader, click on the banner and drag it from the list of Available Banners into the Banner Loader. After you have added up to four banners, you can re-order them in the banner loader by dragging and dropping them.
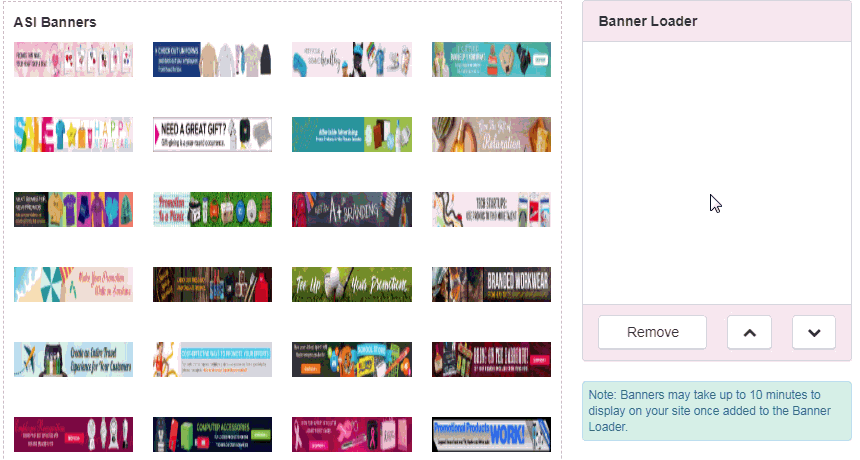
To remove a banner from the banner loader, click on the banner and select remove.
To upload custom banners, scroll down to the banner upload area. Click on the Upload Banner Image button.
Then, select the banner size and click on the Browse button.
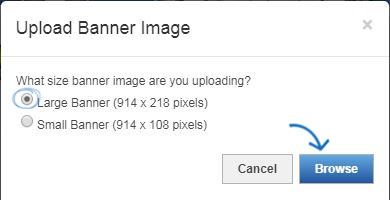
Browse your computer, select the image you would like to use, and then click on the Open button. After you upload your image and select your level, you will need to set up the Click-Through-Destination for this banner.
Banner Linking
- Product Detail Page
This option enables you to link to the product detail page of an individual product. To link the banner to a product detail page, the product will need to be on your clipboard. Select the "Product Detail Page" dropdown and choose the product. To add a product to clipboard on the fly, click on the Add Product to Clipboard button to browse products and add them to the clipboard.
- Select-A-Searches
This option enables you to link your banner directly to a Select-A-Search. Select-A-Searches, also known as Saved Searches, are links to already established searches and acts as a shortcut for your customers to click on and access products without having to search. You can select from your already created Select-A-Searches or create one in this area by clicking on the Create New Select-A-Search option.
- URL
This option enables you to type or paste a URL for your banner to be directed to. Just select URL and type the web address (ex: http://www.asicentral.com).
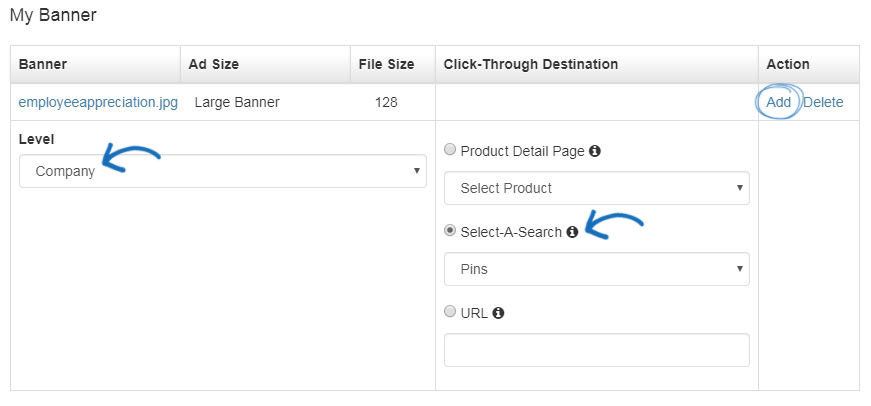
When you are finished configuring the banner settings, click on the Add link. The banner will be appear in the Available Banners area. When you are ready to post your banner, drag and drop it into the Banner Loader.
After you have finished making your changes, click on the Save button and then click on the Make Changes Live link to publish.
Introductory Text
The Introductory Text area is where you update the text that is shown on your home page.
In the Introductory Text area, type a headline and text in the available boxes.
Use the text editor toolbar to edit the style of your text (hovering over the options in the toolbar will let you know what each tool will help you accomplish). You can also click on the HTML button to edit the HTML of your Introductory Text.
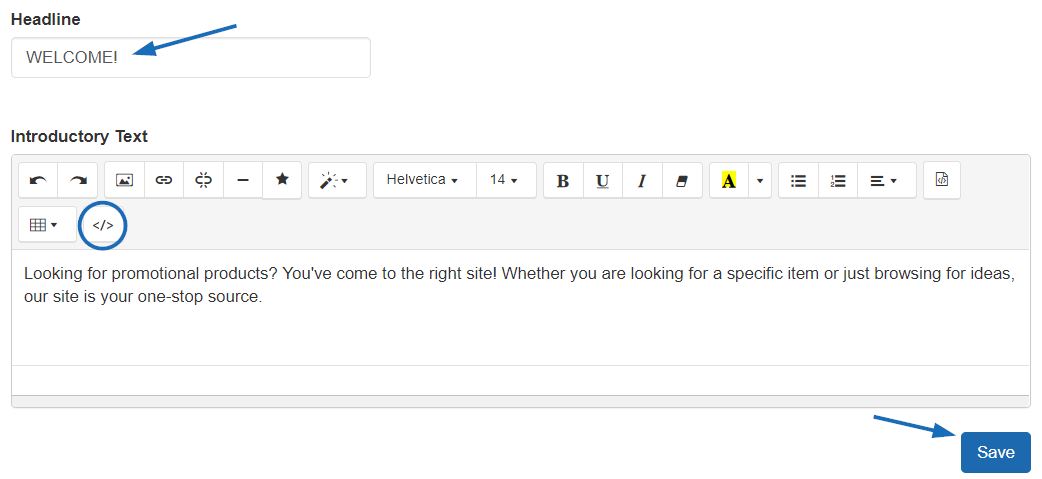
After you have finished making your changes, click on the Save button and then click on the Make Changes Live link to publish.
News and Video
Depending on the template you have selected, the News & Video page may not be available for modification and a red warning message will be displayed. The News and Video section contains two tabs: Home Page and News and Video Page.
Home Page Tab
In the Homepage tab, you can make selections about the editorial and video content which will be displayed on your home page.
The Editorial Feed section enables you to allow delivery of news articles to your home page.
There are three options for displaying Video Content on your home page:
- Allow client-safe video content to be added to my ESP Website home page and updated automatically.
- I want to feature my own video content on my home page. This option will enable you to paste a URL to a YouTube video of your choice (ex: http://www.asicentral.com). Just type/paste the URL into the available box.
- No thanks, I don't want to feature video content on my home page.
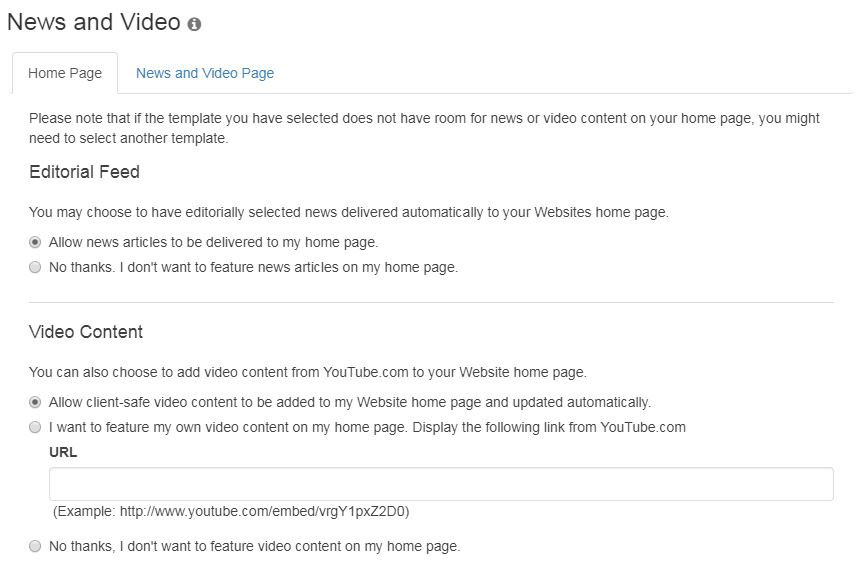
When you are finished making your selections, click on Save.
News and Video Page Tab
Within this tab there are two options in the Industry News, Video and Events section:
- Yes, I want to feature a page just for Industry News, Video and Events
- No Thanks. I don't want to feature a page of Industry News, Video and Events on my ESP Website
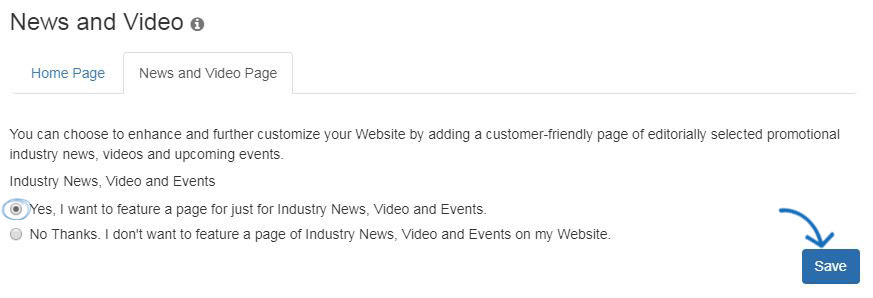
Click on the Save button when you have finished making your selections.
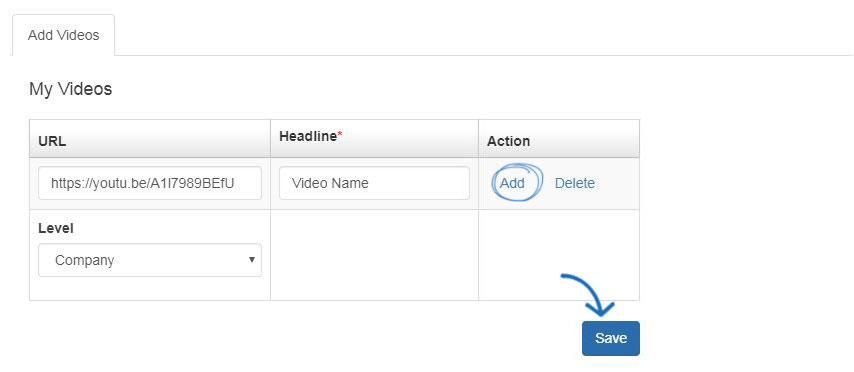
Video Content
This section, enables you to select the video content of your Industry News, Video and Events page. There are two options:
- Let the system choose the videos on my Industry News, Videos, and Events page.
- Let me customize the video content on my Industry News, Videos, and Events page.
If you select "Let me customize the video content on my Industry News, Videos, and Events Page", you can type or paste the URL for the video in the URL box, select a level and enter a headline. Lastly, click on the Add link.
When you are finished making your selections, click on Save and then click on the Make Changes Live link to publish these updates to your ESP Website.
Advanced Page Manager
The Advanced Page Manager section is where you can edit and create new pages for use on your ESP Website or Company Store.
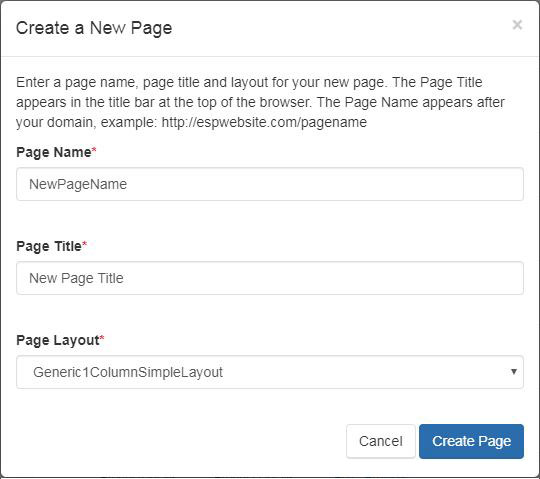
To create a new page, click on the Create New Page button. You will need to enter a Page Name, Page Title, and Page Layout.
- Page Name is the extension for this page from the site's URL. For example: abcpromotions.espwebsite.com/AboutUs.
- Page Title is the text that appears in the browser bar. For example:

- Page Layout refers to how many columns your site will have. Generic2Column is the most standard, and recommended option. However, if you want your site to have 3 columns, select Generic3Column layout instead.
When you finished entering this information, click on the Create Page button.
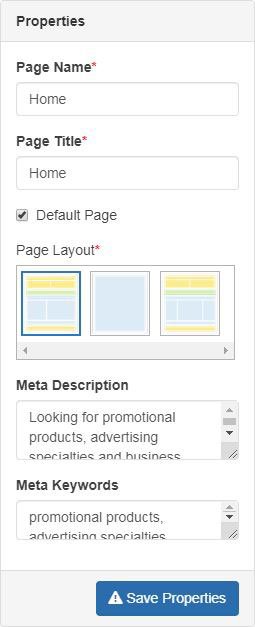
Page Properties
When you click on the Edit link in the Manage Pages area, the properties of that page will open in the Properties area.You can check the Default Page box to make this your default page. Your default page is what displays when your site is accessed, otherwise known as your Home page.
There are Page Layouts available with a thumbnail preview. Click on a layout to select it.
The Meta Description and Meta Keywords boxes are where you can enter individual meta tags for this page.
- Generally, meta tags consist of three fields: title, description, and keywords. The title and description of your site will be displayed on a search engine's results page. The description should be written in full sentences.
- Keywords, on the other hand, will not be seen and are only for the search engine's background ranking processes. In this section, you can enter multiple keywords, separated by commas. For example: promo products, imprinted products, promo items, imprinted items, etc.
When you are finished customizing the properties of your page, click on the Save Properties button.
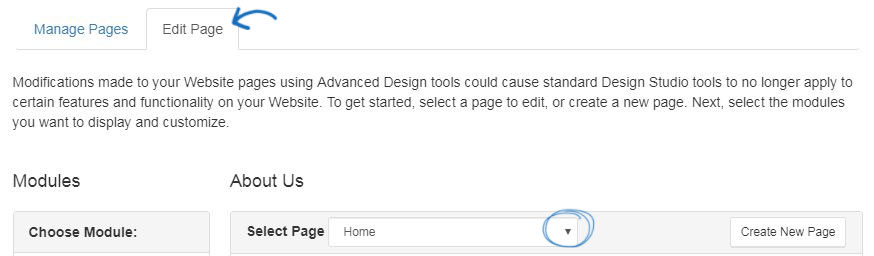
Edit Pages Tab
The Edit Page section displays your page in terms of modules and zones. Essentially, the feature you would like to have on your page is a module (Select-A-Search, Product Collection, Text, etc.) that you place inside of a zone area.
The zones are broken down into sections:
- Header
- Main
- Footer
The first step is to use the Select Page dropdown menu to select the page you would like to edit. You can drag a module to a zone and then configure it.
Then, after dragging and dropping the module into the zone, you will need to configure that module. The configuration options will vary depending on the module's capabilities. In the example below, the site logo is being added to the header section and set to Global. Modules which are set to Global will be displayed in the same zone on all pages of the site and are commonly used for the Header and Footer. Non-global modules will only be displayed on the page to which they have been added.
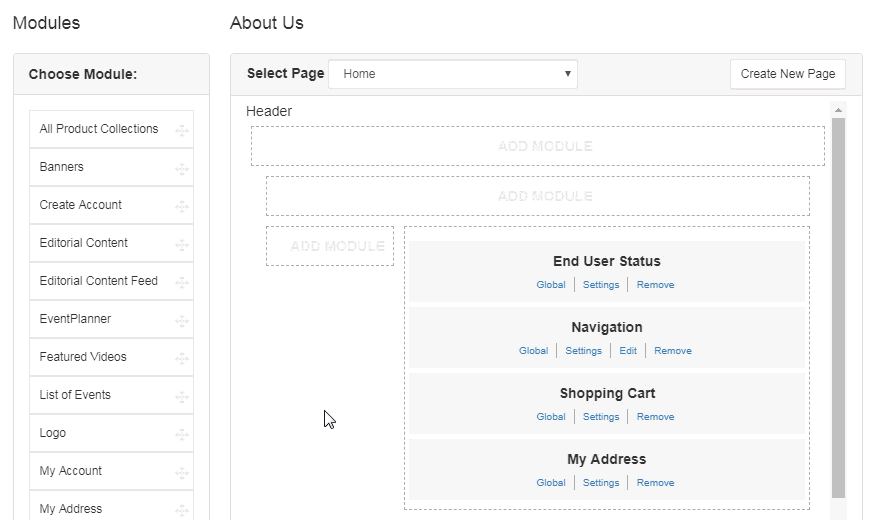
Multiple Modules Per Zone
More than one module can be added to a zone, and modules can be dragged and dropped from one zone to another. There is no save button in this area. All changes are automatically saved.
To make these changes live, click on the Make Changes Live link.
Advanced Site Menu/Navigation
The Advanced Site Menu/Navigation area is where you can edit, create, and manage navigation menus for use on your ESP Website and Company Store(s).
Create a New Menu
To create a New Menu, click on the Create a New Menu button.

Then, configure the new menu by:
- Selecting whether you want to create a new menu or copy an existing one.
- Naming the menu (ex: Quick Links).
- Selecting whether you would like this menu to be horizontal or vertical.
- Clicking on the Create Menu button when you are finished.

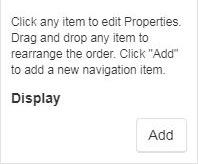
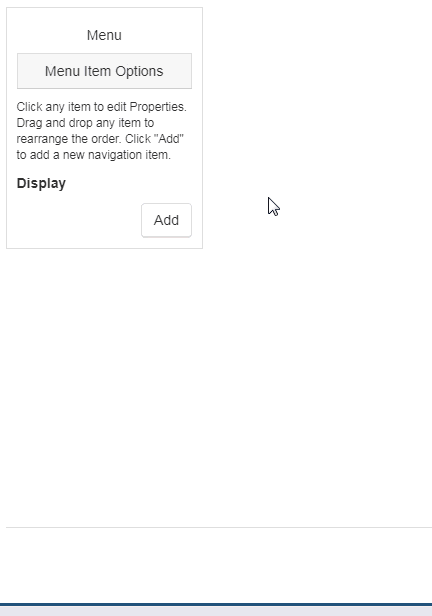
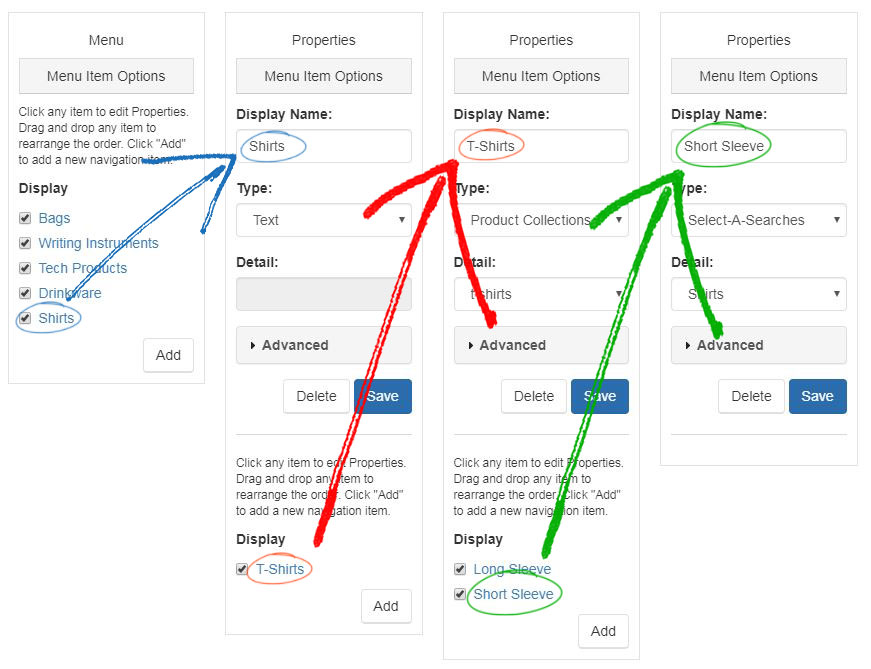
Add Menu Items
Now, begin building the menu by clicking on the Addbutton in the Menu section on the left. Configure the menu item by entering a display name and selecting a type. When you are finished editing this menu item, click on Save.
Submenus
The navigation found below the Advanced options area of the Properties box is the dropdown menu associated with its parent link. Clicking on the Add button will open a new Properties window and create a submenu item. Up to two levels of submenus can be created. In the example below, the main menu option is Shirts, with a submenu of T-Shirts, and an additional submenu for Long Sleeve and Short Sleeve.
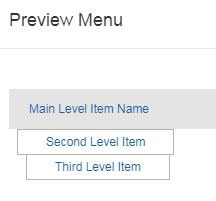
Use the Preview button to see how this menu will be displayed on the site.
Uncheck a menu item to make it inactive.
After you have finished making your changes, click on the Save button and then click on the Make Changes Live link to publish.
 Français
 Español