


Suppliers are able to create specials that will appear in ESP. Products that are added to specials will be displayed in the Specials section of ESP Web. Click on the Specials tab from the ESP Updates homepage to manage specials. In this area, you can create a special, find and edit previously created specials, or copy a special to create a similar version.

Create a Special
To create a new special, click on the Create a Special button.

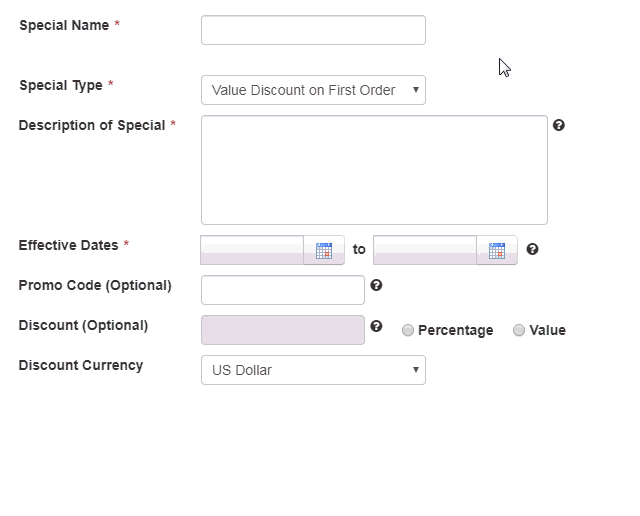
Next, enter information about this special. The required fields are denoted by a red asterick (*). Use the dropdown next to Special Type to select the type of special you are creating. Enter the details of the special in the Description of Special field, such as "Enter Promo Code 'Summer' to receive $100 discount!". To enter a discount amount, you will need to select percentage or value before you are able to enter the amount.
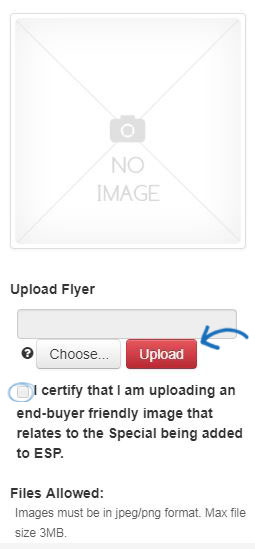
You can upload a flyer, which users of ESP can see and share. Click on the Choose button to browse your computer and select a file. Then, click on the Upload button. A preview of the flyer will be displayed in the preview box.
After adding information about this special, click on the Save button. You can then begin adding products by clicking on the Add Products button.
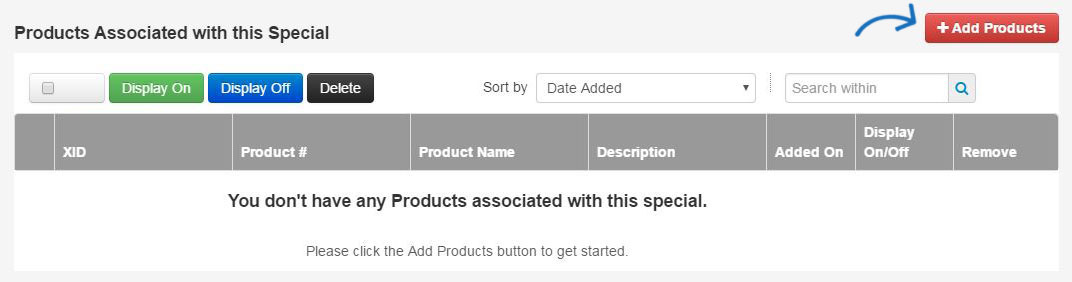
The Add Products to Special window will open. You can enter search terms in the Search Within box, use the guided navigation on the left, or sort the products to locate the product(s) you would like to add to this special. Use the checkbox on the product listing to select it. Then, click on the Add Products button. A product can only be added to one special at a time.

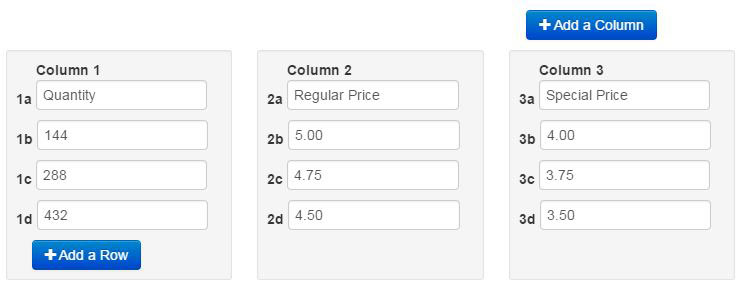
If you would like to display a table for this special on the Full Details section of ESP, enter information in the Special Details area.
You can use the Title box to enter a heading for the table. Then, you can use the columns and rows to create a display for this special. In the example below, the display table has been used to show the pricing for this special. It is important to keep in mind that even though the specials display table has been used to show pricing, it will not replace the existing product pricing, nor will it be displayed when a distributor is placing an order.
To save the Specials Display, scroll to the top and click on Save.
Once you are finished creating the special, or editing a previously created one, click on the "Back" link to return to the list of specials.

Manage Specials
After creating a special, it will appear in the Specials listings. To find previously created specials, type the name of the special into the search field and click on the magnifying glass icon. You also have the option to use the filter on the right to locate all Active, Inactive, or Scheduled Specials.
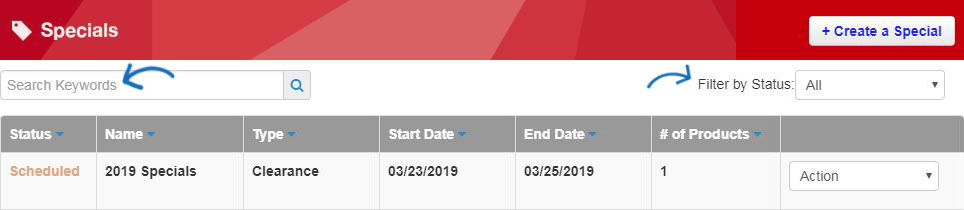
The Listing section will show if the special is active, inactive or scheduled to be activated in the future. It will also list the Name and type of special, the start and end dates as well as the # of Products attached to the special.
- Active: Specials are available now.
- Inactive: Specials that have expired or you have specifically made inactive.
Note: Once a special is made inactive, you cannot re-activate. - Scheduled: You can schedule a special to start at a later date. Once scheduled you don't need to do anything. The special will automatically display on the start date.
Specials will display on the Specials listing regardless of the status so that you always have a history of your specials.
Once you find the special you've already created, you can copy, edit or make the special active/inactive by clicking on the Action dropdown list.
Note: Once a special is made inactive, you cannot re-activate.

Copying a Special
Click the copy button. The Create Specials screen will open with the following attributes will automatically be copied to the new Special.
- Special Type
- Description of Special
- Promo Code
- Discount
- Market Segment
- Percentage or Value Radio Button selection
- Discount Currency
- Flyer Uploaded as well as the checkbox certifying that the user has uploaded an end-buyer friendly image
- Special Details including Title (Header Table), Column information
The following fields will not be copied over and must be entered for the new special:
- Special Name
- Effective Date
Once the newly created special has been saved, products can be added by clicking the Add Products button or by copying products from another special.
Copying Products from another Special
You are able to copy the products from a previously created special, regardless of the other special's status. Click on the Copy Products button.

Clicking Copy Products will display a modal window with all existing specials. You can use the Filter at the upper right to select either All, Active or Inactive speicals to easily find your Special. Choose the Special you want to copy products from and then click Select. Only one special can be selected from the modal window at a time. Only products that are not part of an active special will be copied over.

Any products not in an active special will be copied over and displayed in the products section.
To Remove Products from a Special, find the special and click edit. Scroll to the bottom of the page to the Products Associated with this Special section. You can select the trash can icon on the product that you wish to delete. To delete multiple products at once by checking the box next to each product you would like to remove and then clicking the Delete button.

You can also temporarily turn off the Special display of a product on ESP by checking the box next to the product(s) you want to temporarily removed from the speacial and then clicking the Disply Off button. The product(s) will not show as having a special until you turn the Display on again. To turn the special back on for the product, click the Display On button.

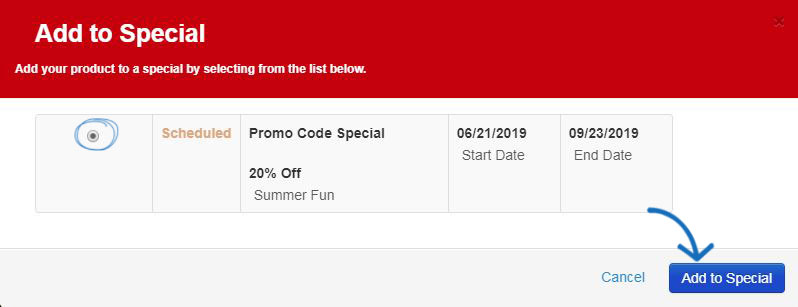
You can also add a product to a Special from the Manage Products Tab. Find the product you wish to add to an existing special and click the Add to Special Button.

A list of your Active and Scheduled Specials will populate. Select the Special and click the Add to Special button.
Note: you can only add a product to one special. If you want the product to appear in multiple specials, the Specials effective dates may not overlap.
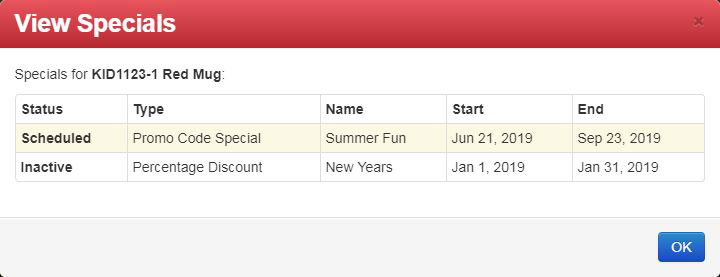
From the Manage Products Tab you can also determine if a product is already on a Special. Find the product on the Manage Products Tab. If the product is on Special you will see a View Specials Button.

A list of specials that your product has been or is currently associated with will display.
How Distributors Will See Products On Special
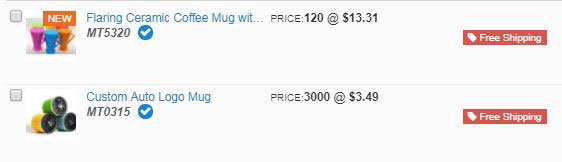
Distributors using ESP Web will see a special flag on all products that have been assigned to a special. In the example below, products that have a free shipping special are displayed with the Free Shipping flag on their product listing.
Distributors can also search by specials using the guided navigation feature of ESP Web, as well as by clicking on Specials from the main ESP Web toolbar.

 Français