


There are several ways to manage products on your ESP Website. You can create:
Product Collections
A product collection is a group of specific items in a single location. As the websites admin, you are able to select exactly which products are included in a product collection. There are also global product collections, which are groups of products with a centralized theme provided by ASI. ASI will manage and maintain the product information in these collections.
Product of the Day
The Product of the Day feature enables you to create a schedule to feature an individual product on your site. As the website admin, you are able to set a specific amount of time for the product using the Product of the Day schedules. You can also choose to have the system choose a Product of the Day automatically, meaning that ASI will select a product to be featured on your site. What would you like to do with your Product of the Day?
Let the System Automatically Display Products
If you are not setting up your own schedule and want the system to rotate products automatically, select one of the first two bullets from the list, and click Save.
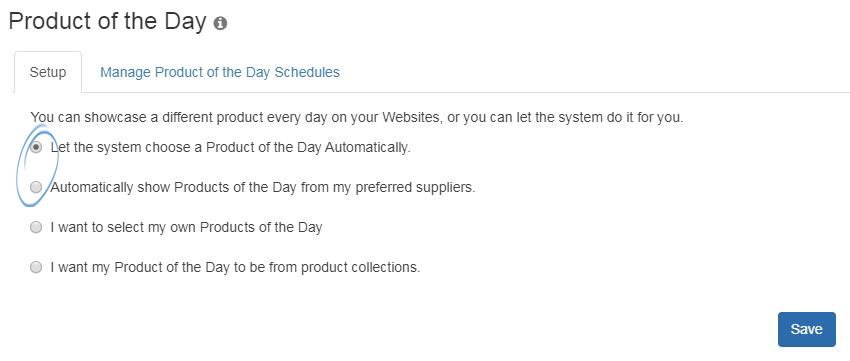
Select Specific Products (including Custom Products)
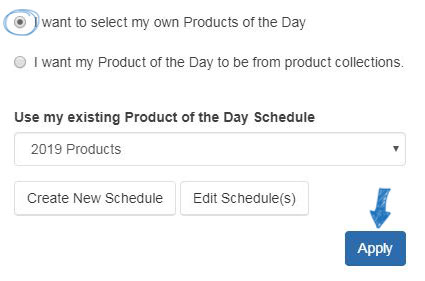
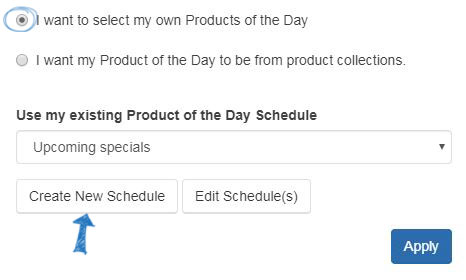
If you select "I want to select my own Products of the Day", you will need to create a schedule. A schedule means a product or group of products to be displayed for specific periods of time.
-
If you already have a schedule created, use the dropdown to select the schedule you would like to use and then click on the Apply button.
-
If you need to create a schedule, click on the Create New Schedule button.
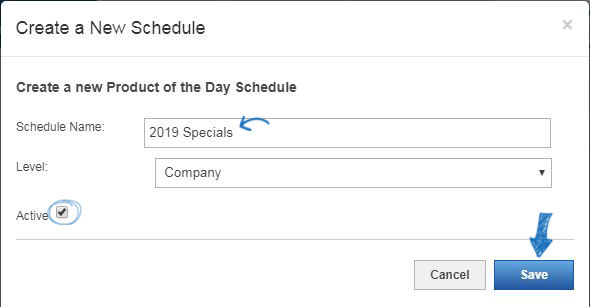
Then, in the pop-up window, enter a schedule name and check the Active box before clicking on Save.
Whether you have created a new schedule or need to edit an existing one, the schedule will be available in the Manage Product of the Day Schedule tab. To begin adding/editing the products within a schedule, locate the schedule name within the listings and then click on the Edit button in the Actions area.
Note: Schedules with a level of "Global" are provided by ASI for use on your site. They cannot be deleted, but you can click on the Products link to set when each product should be displayed on your site.

Then, click on Schedule Products in the Scheduling Properties section.
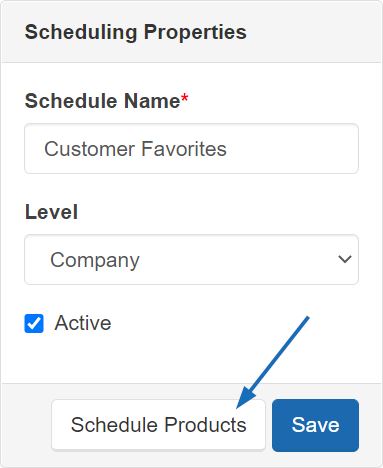
To schedule products for a schedule, locate the schedule you would like to add products to and click on the Edit link. Then, click on the Schedule Products button in the Scheduling Properties area on the right.
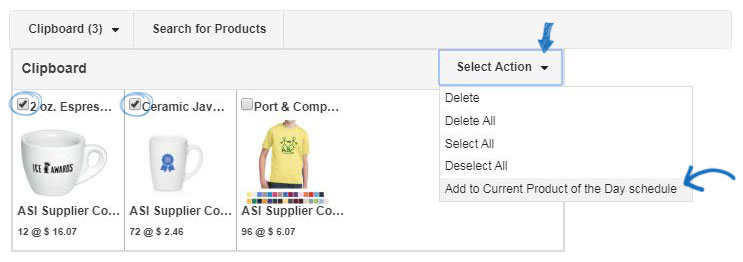
Clicking on the Schedule Products button will open a new tab named Edit Schedule. In this new tab, you can select to either add products from your Clipboard or search for products using the ESP Web Quick Search (including custom products).
- Adding Products from the Clipboard
Click on the Clipboard button, mark the product(s) you would like to use, and then click on the Select Action button dropdown to choose the Add to Current Product of the Day Schedule option.
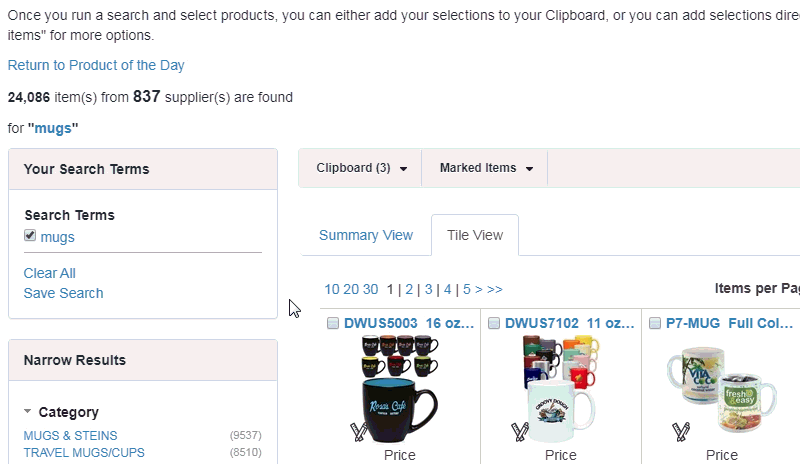
- Search for Products
To add a product(s), click on the Search for Products button, search for the product you would like to use, mark it, and then click on the Marked Items button. If you would like to use custom products, search using your ASI number or the product number you assigned to your product. Select "Add to Current Product of the Day Schedule" from the dropdown. When you're finished adding products, click on the Return to Product of the Day link.
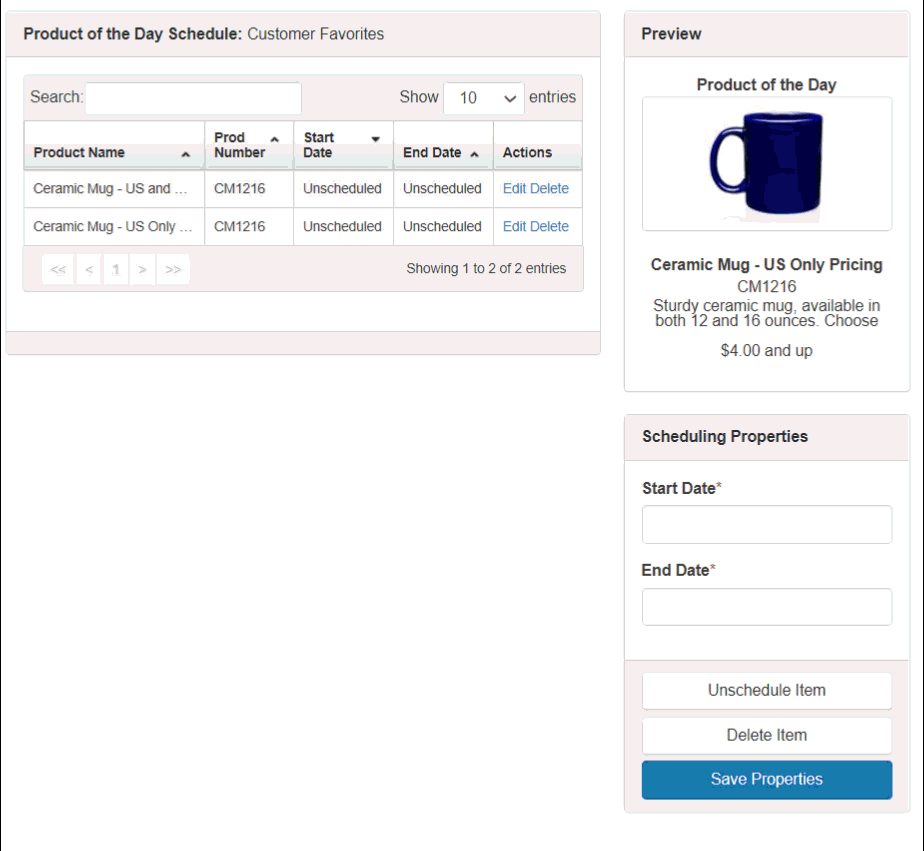
After selecting the products you would like to use, you will need to designate the duration each product will be displayed as the Product of the Day on your ESP Website.
Directly below the Preview box, a Scheduling Properties box is displayed. Here, you can enter a start date (date you would like the Product of the Day to begin showing on your site) and an end date (date you would like the Product of the Day to stop showing on your site). Then, click on the Save Properties button. The product will show with its start and end dates in the Product of the Day Schedule area. Repeat this process for all additional products you would like to include in the schedule.
Note: Schedules can be set for up to 90 days from the current date.
After you have added all of your products and set your schedule, click on the Setup tab. Then, select "I want to select my own Products of the Day" and use the dropdown to select the schedule you would like to use. Click on the Save button.
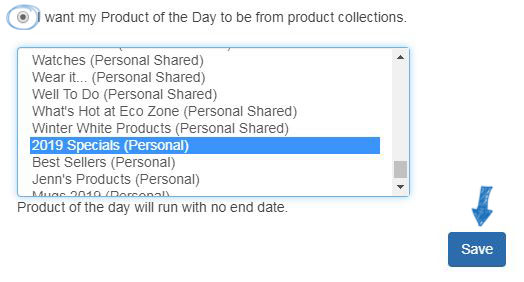
Use Products from a Product Collection
If you select "I want my Product of the Day to be from Product Collections" option, the items will be sourced from an existing product collection. When choosing this option, there is no expiration, products from the product collection will be randomly rotated indefinitely.
After selecting the option, use the list to locate the Product Collection you would like to use and then click on the Save button.
Saved Searches
If you are looking to save your customers time searching, create some saved searches! You are able to use the Products area to search for any product(s) you like, then use the available options to narrow the search results. Once you are comfortable with the remaining results, you can save the search. Then, you can create a navigation link with the already narrowed search results.
Saved Searches, also known as Select-A-Searches, are links to already established searches. The links act as shortcuts to predetermined product searches, like "Caps & Hats".
Saved Searches, also known as Select-A-Searches, are links to already established searches. The links act as shortcuts to predetermined product searches, like "Caps & Hats".
There are two ways to create a new Saved Search:
- To create a new Saved Search from the Global Features area, click on the My Saved Searches and then click on the "Create New Select-A-Search" button, where you can use the search options to create your search.
- Click on the Products option from the main Websites Admin toolbar. Then, use the search options to create to create your search.
Type your search criteria using keywords into the search field and click Go.
Note: You can further refine your search by using the Narrow Results area under the "Your Search Terms" box.
After you’ve completed your search, you will need to save it by clicking on the Save Search button.
Then, enter a name for this Select-A-Search and then click on the Save button.

You can continue searching and saving the searches. After you have finished saving searches, you can create navigation links using the saved searches.
Custom Products
Custom products are a really handy feature of ESP Websites and Company Stores because they enable you to create completely customize products for your customers to order from your site, or you can personalize an item from a supplier.
Exclusion Lists
If you would like to have certain types of products or products from a specific supplier excluded from the search results on your site, you can create an exclusion list in the Global Features section of the ESP Websites Admin.
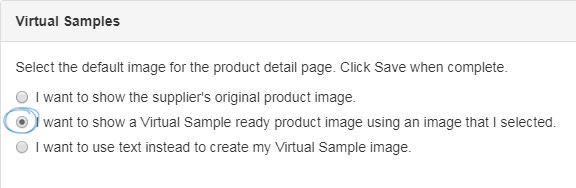
Virtual Samples
Virtual Samples enable you to display all Virtual Sample-enabled products with the Supplier's original product image or display with a logo from your Image Library (Media Manager).
To show virtual samples, locate the site you would like to edit. Then, expand the Manage Product section and select Virtual Samples.
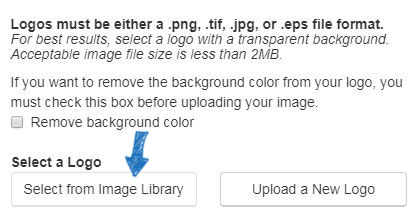
To display a logo on the products, click the radio button for "I want to show a Virtual Sample ready product image using an image that I selected." Then, click the "Select from Image Library" link.
It is important to check the "Remove background color" checkbox first before uploading. Click on the Select from Image Library button to use a previously uploaded art file.
Hover on the image you would like to use from the Media Manager and then click on the Select File link.

You can also use the "Upload a New Logo" button to upload images for use as Virtual Samples. After clicking on this button, the File Upload dialog box appears. Navigate to your logo, select it, and then click Open.
Note: The file upload window and process looks differently on a Mac.
A preview of the image will appear in the Image Preview section.
If you do not have a logo, you can also select to use text and type your text in the available text box.
When you are satisfied with your selections, click "Save" and then click on the "Make Changes Live" link at the top. Now, the applied logo appears on virtual sample-enabled products on your site.
 Français
 Español