You can access your ASI Account Manager by going to https://billpay.asicentral.com. To get your ASI Account Manager login info, please email customerservice@asicentral.com.
I'm getting an error message when I try to log in
Login errors typically occur when a member forgets their changed or updated password, or there are issues with the server.
Please call 800-546-1350 prompt 1 to request your log in info, or email customerservice@asicentral.com. If you know your username, you can select Forgot Password and it will be sent via email to the Primary contact on the account.
- Company level log in: Only provided to Primary Contact or the authorized person named by the Primary contact.
- Individual log in: Individuals can also log in to view/update/change their own information, but they will not be able to login at Company level & view all company information. This is restricted to the Primary contact.
Pay My Bill
If you have a balance due, the amount will be shown in red text on the homepage. Click on the Invoices tab link to get directly to the Pay My Bill area.

Review the charges in the Pay My Bill tab. Then, enter your credit card information.
- If you have a credit card that has been saved for your account, click on the Retrieve button to complete the fields with the saved credit card information.
- If you do not have a saved credit card, select One Time Payment and enter your credit card information using the available fields.
After reviewing the charges and filling in the payment fields, click on the Pay Now button.
Company Profile
To manage your company's demographic information using the ASI Account Manager, go to the Profile tab.
If your account does not contain specific information, you will be alerted directly after logging in. Clicking on the Profile tab will take you directly into the Profile area, where all of the primary and demographic information is located for your company.
If your account is complete, click on the Continue link to go to the main page. Then, click on the Profile tab.
Review the information in the Primary Information and Published Demographic Information areas.
In the Primary Information area, you can update your Bill To and Ship To addresses, as well as the company phone, fax, email and website. Just click on the Submit button when you are finished with each area.
In the Published Demographic Information area, you are able to type updated data into the available boxes. Information in this area is automatically saved.
Addresses and Communication
Physical Addresses
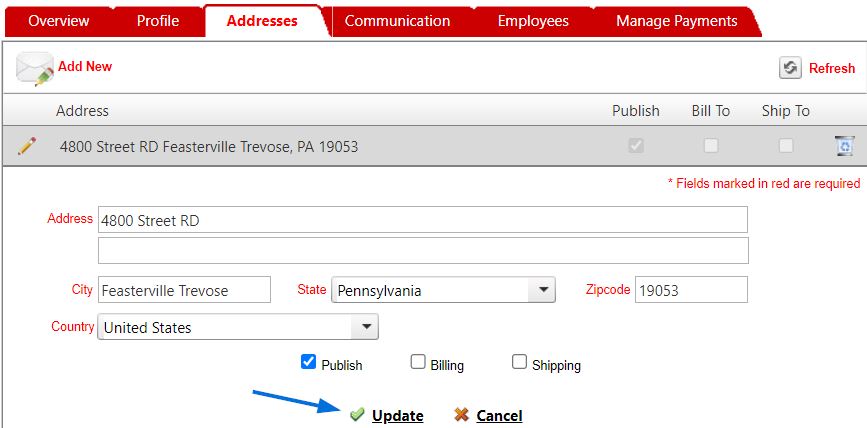
To add or edit physical addresses, go to the Addresses tab. There are three options:
- Add New: Create a new physical address
- Pencil icon: Edit an existing address
- Garbage can icon: Remove an address

The star icon indicates that the address is tied to the primary information for your company’s profile.
When adding or editing an address, be sure to enter information in all required fields. Additionally, use the checkboxes to designate the address as the preferred address for Publish (where publications should be sent), Billing, and/or Shipping.
Note: One address can have multiple designations.

If you are updating an existing address, click on Update when you are finished. If you are adding a new address, click on Add.
Communications
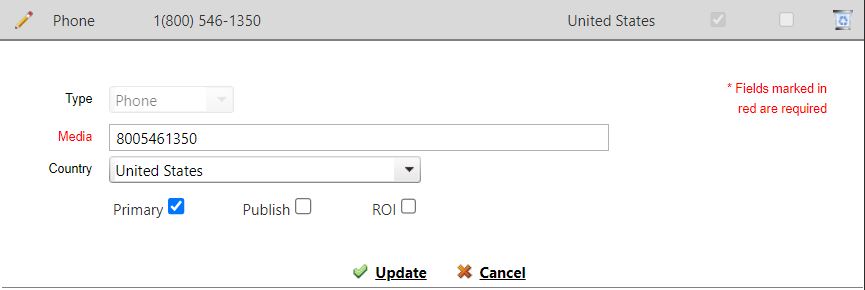
To add or edit electronic communication fields, such as phone and fax numbers or email and website addresses, go to the Communications tab.
To add/update the information for electronic communications, click on the option you need:
- Add New: Create new communication type
- Pencil icon: Edit an existing communication type
- Garbage can icon: Delete communication type

When adding or editing a communication, use the type dropdown to select from phone, fax, mobile, email, or web. Then, enter the media information and use the dropdown to the select the country.
Additionally, use the checkboxes to designate the address as the preferred address for Primary, Publish (where publications should be electronically sent), and/or ROI.
Note: One communication type can have multiple designations and you can designate a primary for each communication type.

If you are updating a communication, click on Update when you are finished. If you are adding a communication, click on Add.
Manage Employees
To manage employee information, go to the Employees tab and select the icon for the action you would like to take:
- Add New: Add a new employee
- Pencil icon: Edit an employee's information
- Garbage can icon: Remove an employee

When adding or editing an employee, the only two required fields are first and last name, but you can enter information in all available. Additionally, use the checkboxes to designate the employee as the main contact for Publish, Marketing, and/or Artwork.
Note: One employee can have multiple designations.

If you are updating information, click on Update when you are finished. If you are adding a new employee, click on Add.


